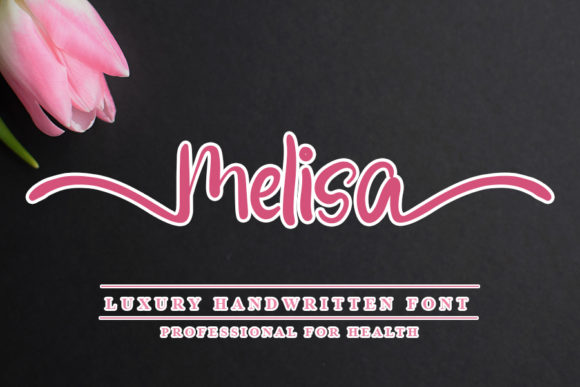
Melisa: Integrating a Sweet Handwritten Font into Your Daily Creative Workflow
Every designer, creator, and entrepreneur eventually faces a familiar moment: the search for a typeface that carries genuine warmth without sacrificing professionalism. Melisa is exactly that – a sweet handwritten font with a trendy, flowing character. It doesn't scream for attention, yet it has a delicate presence that can shift an entire project’s emotional tone. Understanding where this font fits in your process helps you move beyond decoration and into meaningful, efficient visual communication.
Handwritten fonts can be tricky. Many feel overused or cheap, but Melisa’s natural, balanced letterforms avoid that trap. Its ligatures and swashes remain readable while preserving a handcrafted impression. Whether you’re designing wedding stationery, crafting a social media campaign, or building a personal brand identity, the way you embed this resource into your workflow determines the outcome far more than the font itself.
Identifying Where Melisa Belongs in Your Project Timeline
Before downloading and installing a font, experienced designers consider its role in the larger picture. Melisa works best when brought in early, during the concept phase, not as a last-minute styling attempt. If you’re planning a wedding invitation suite, for example, the font choice influences paper selection, color palette, and even the printing method. A delicate script like Melisa pairs well with textured cotton stocks and letterpress techniques, but might struggle on high-gloss surfaces unless you adjust the sizing and spacing carefully.
For digital social media posts, turn to Melisa during content calendar planning. Decide which type of posts benefit from a soft, personal touch – behind-the-scenes clips, testimonials, inspirational quotes, or story highlights. Once you define those use cases, you prevent the font from appearing inconsistently and diluting your visual strategy. Day-to-day efficiency comes from narrowing the number of typographic choices upfront, not from hunting for them mid-task.
Practical Implementation Across Common Creative Mediums
Melisa’s design lends itself to several distinct applications. Let’s break down how to use it effectively in each scenario, along with the supporting tools and methods that produce reliable results.
Wedding Invitations and Stationery Art
Melisa shines in print design. Its letters contain subtle thick-to-thin variations that mimic real calligraphy. When preparing a wedding suite, start by setting the couple’s names in the font at a generous size. Headlines in 36-48pt create an elegant focal point. For body copy like venue details and dates, pair Melisa with a clean sans-serif such as Montserrat or Open Sans for contrast without clutter. Keep Melisa off long paragraphs – its script nature reduces readability for extended text.
Before sending files to print, print a physical proof at full size. Check if the swashes become too fine and risk breaking during a foil stamping or embossing process. Adjust stroke weight or simplify the glyphs if needed. Many design applications like Adobe InDesign allow you to convert text to outlines and manually tweak delicate points without altering the font file. This small quality-control step saves time and money by catching issues before production begins.
Social Media Graphics and Digital Content
For eye-catching social media posts, Melisa operates differently than in print. Screen resolutions reward slightly larger font sizes and increased letter-spacing. In a 1080x1080 pixel Instagram post, a short phrase set in 60-80pt Melisa with tight tracking can still remain readable, but test it on a mobile screen before publishing. Tools like Canva, Figma, or Photoshop treat the font natively once installed, so batch-creation becomes simple.
- Create a reusable template with Melisa in the hero position.
- Lock the font style, size, and color in your design system to avoid drift.
- Use the font for no more than two design elements per graphic – typically a headline and a small accent.
- Save the template with the font embedded as curves if you share the file externally, protecting licensing while keeping the layout intact.
Branding and Small Business Identity
Small business owners often default to safe sans-serif logos. While that works for many, Melisa can become a signature element for boutiques, coffee shops, bakeries, or beauty brands. In a logo, isolate the font for the business name, then build the tagline and supporting typography around it. Test the logo in single-color applications immediately – a sweet handwritten font must remain recognizable even in black on white. If it loses too much character, consider keeping Melisa for secondary brand assets like packaging inserts, thank-you cards, or website hero images instead.
When integrating Melisa into a brand style guide, document the approved glyphs and alternate characters. Many handwritten fonts include stylistic alternates that can cause inconsistency if different team members pick different versions. Specify which swashes and ligatures are brand standard, and store the font file in a shared company asset library with clear usage guidelines attached.
Workflow Integration with Design Software and Platforms
Melisa behaves predictably across modern design environments. Installing the OTF or TTF file on your system makes it available in Adobe Creative Cloud apps, Affinity Suite, CorelDRAW, and most web-based editors that support custom fonts, like Canva Pro or Adobe Express. In Figma, use the font installer to access local fonts, or upload the file if you have a team plan with shared fonts.
For website usage, Melisa is not a web-safe font. The typical approach involves either using it in static images or converting headlines to SVG with preserved outlines. You can also generate a web font kit if your license permits @font-face embedding, but consult the foundry terms first. As a rule of thumb, limit web use to decorative headers on pages where the design statement outweighs the slight performance overhead of custom font loading.
An efficient workflow looks like this: set up the font locally, design in your primary tool, export proofs as PDF or PNG, and gather feedback. Only when the design is finalized do you move to platform-specific delivery (SVGs for web, outlined EPS files for print vendors, or high-res JPGs for social media). This keeps the font in a single, controlled environment as long as possible, reducing the chance of accidental substitution.
Preparing Your Toolkit: Licensing, Compatibility, and Organization
Before using Melisa in any client or commercial project, check the license file. Handwritten fonts sometimes carry restrictions on embedding, alteration, or trademarking. Clarify whether you can use the font for logos, merchandise, or ebooks. Keeping a spreadsheet of your font licenses saves awkward re-negotiations later. If the font is used by multiple team members, purchase enough seats or choose a multi-user license that covers your organization.
On the technical side, keep Melisa organized in your font management software. Tools like RightFont or FontBase let you activate and deactivate the font quickly, preventing conflicts and maintaining system performance. Run a font validation tool upon download to ensure no corrupt glyphs exist – a step that takes seconds but prevents hours of debugging when a print job fails.
Pairing Melisa: Building a Cohesive Typographic System
No font works in isolation. Melisa pairs best with typefaces that provide a grounded, neutral contrast. Consider these tested combinations:
- Melisa + Raleway: The thin, modern sans-serif serves as an elegant companion for wedding stationery.
- Melisa + Lora: A readable serif brings warmth to editorial or blog layouts without competing for attention.
- Melisa + Poppins: The geometric shapes balance Melisa’s organic flow in social media and branding.
When you build a project style guide, define the pairing early. Assign Melisa to level-one headings only, or use it for pull quotes and decorative elements. Restricting its role purposefully creates a stronger visual hierarchy than allowing it to appear everywhere.
Test pairings at the start of a project by setting sample text with both fonts side by side. Check x-height alignment, contrast in stroke width, and how the fonts interact in different weights. A quick testing phase reduces time-consuming revisions later and helps you spot legibility issues before they reach a client presentation.
Consistent Quality Control Across Projects
Using a delicate handwritten font like Melisa demands extra vigilance in the review phase. Check for:
- Baseline wobble: Script fonts sometimes appear uneven across lines. Adjust the vertical alignment manually if necessary.
- Awkward connections: Certain letter pairs may join unnaturally. Reviewing glyphs individually allows you to use alternates or kerning overrides.
- Color contrast: Thin strokes can disappear against busy backgrounds. Test the font on intended backgrounds at 100% opacity.
- Scaling issues: If the design requires resizing, always scale proportionally and double-check swash thickness to avoid pixelation or breakage.
For team-based workflows, create a checklist. Before final export, confirm the font is outlined or the file is packaged with the font properly embedded. If sending source files to a printer, ask what format they prefer – many still need outlined text to avoid missing font errors. While modern packaging features in InDesign and Illustrator handle this, not all vendors have updated software, and explicit outlining remains the safest cross-platform method.
Long-Term Value: Building a Personal Brand and Efficient Asset Library
Over time, Melisa can become a recognizable part of your visual signature. Freelancers and bloggers often adopt a single decorative font across collateral, building brand recall. Consistency matters more than variety here. Clients begin to associate that flowing handwritten style with your personality, so apply it deliberately across your website, email newsletters, business cards, and social media templates.
From an organizational perspective, add Melisa to a curated “expressive” folder within your font library. Separate it from text fonts and standard sans-serifs. When starting a new project, this curated set becomes your go-to collection, cutting decision fatigue. Every few months, review your font library and remove options that no longer align with your current direction. A small, well-tested set of typefaces yields faster design decisions and more cohesive output than an enormous, unwieldy catalog.
Real-World Workflow Example: A Wedding Invitation Project from Start to Finish
Imagine a freelance designer creating a suite for a spring wedding. After the initial client conversation, they place Melisa into a mood board alongside floral motifs and a pastel palette. During the sketching phase, they experiment with Melisa for the couple’s names and a single romantic quote. The designer quickly identifies that the font works best on a white or light cream background with generous margins, so they set up an InDesign document with those properties.
As the design develops, they pair Melisa with Lora for the body text, adjusting the leading to 14pt for readability. They check printing specifications with a local letterpress shop, confirming that Melisa’s thinnest strokes meet the 0.5pt minimum. A few swashes require substitution with slightly bolder alternates. Once finalized, the text is outlined, and the file is packaged. The project moves from concept to print smoothly because the font choice was embedded in the workflow early, not tacked on at the end.
If the same designer handles the client’s wedding website, they avoid using Melisa as live text. Instead, they design a hero banner in Photoshop with the font, export as a high-resolution image, and upload it. This preserves the look while keeping the site fast and compatible with all browsers.
Extending Melisa into Ongoing Content Creation
Beyond a single project, Melisa becomes a reliable asset for recurring tasks. Social media managers can create a “quote card” template where every Monday’s inspirational post uses the font with a consistent drop shadow and color overlay. Bloggers can set their post title images to use Melisa, creating a recognizable home feed. Each application doesn’t require new decisions – it flows from a pre-established system.
To maintain this system, update your master templates quarterly. Small adjustments like font size or padding may be necessary as platform dimensions change. Keeping the original editable layers intact allows you to adapt without rebuilding from scratch. If you work with collaborators, share a locked layer with the outlined font and an instruction layer explaining the font’s usage rules.
The most practical way to measure Melisa’s impact is to observe engagement metrics after integration. Did wedding invitation previews receive more inquiries? Did Instagram posts with a handwritten headline outperform standard ones? That data feeds back into your workflow, helping you decide when to use expressive fonts and when a simple sans-serif is more effective.
In the end, Melisa is more than a sweet handwritten font – it’s a tool that, when deliberately integrated into your planning, execution, and review processes, consistently produces beautiful, emotionally resonant work. Approach it with the same practical care you apply to photo editing, layout grids, or color selection, and it will reward you with elegant, lasting results.